Cold Plunge
DIY Cold Plunge: Build One for $400–$1,900
Build a DIY cold plunge using a stock tank, chest freezer, or portable tub. Real cost breakdowns, chiller options, and filtration guidance for every budget.
Disclosure We may earn a commission from links on this page, at no extra cost to you — and we only recommend gear we'd stand behind. How this works.
VEVOR Ice Bath Tub XL, Cold Water Therapy Plunge Tub for Athletes, Portable Outdoor Ice Barrel Plunge Pool for Recovery (Black, 105 Gal)
Best for Budget entry-point vessel for ice-based or chiller-paired builds
The best dollar-per-gallon vessel on this list. At under $60 as of July 2025, it's the obvious starting point for a first build or an ice-bath trial before investing in a chiller. Wrap it in foam board to extend your ice window.
The good
- 105-gallon capacity handles most adults comfortably
- 4.5 stars across 388 reviews — strong signal for a sub-$60 vessel
- Barrel form factor retains ice better than flat-bottomed tubs
- Lightweight and portable; easy to drain and move
The catch
- No built-in insulation — ice melts faster without an exterior wrap
- Not designed for permanent chiller connection; plumbing requires DIY adapter work
- Plastic construction less durable than galvanized steel over years of use
VEVOR Cold Plunge Tub, 216 Gallon, Inflatable Ice Bath Tub Compatible with Water Chillers, Portable Cold Water Bathtub with Insulated Lid, for Athletes Recovery
Best for Larger users or chiller-paired builds needing a purpose-built vessel
The pick for anyone running a chiller setup who doesn't want to drill into a stock tank. The pre-fitted chiller ports and insulated lid make this a thoughtful DIY-friendly design. Verify current pricing on Amazon before committing.
The good
- 216-gallon capacity — genuinely spacious for a full-body soak
- Explicitly designed for chiller compatibility (pre-fitted ports)
- Insulated lid included, which reduces chiller run time
- 4.5 stars across 388 reviews
The catch
- Price not publicly listed — requires direct check on Amazon
- Inflatable construction less rigid than a stock tank; long-term durability under daily use is unproven
- Large footprint (59" x 31.5" x 29.9") needs a flat, dedicated space
Cold Plunge Tub: 85 Gal Round Tub with Full-Wrap UV-Reflective Insulation Cover Bundle for Indoor & Outdoors Use
Best for Ice-based builds where insulation is the priority
The strongest choice for a pure ice-bath setup. The bundled insulation wrap is the differentiator — it's the one accessory most DIYers buy separately anyway. Not the right vessel if you're planning to add a chiller later.
The good
- Full-wrap UV-reflective insulation cover included in the bundle price
- Round form factor distributes ice contact evenly
- 1,000+ reviews at 4.3 stars — one of the better-validated options at this price
- 85-gallon size needs less ice than 100+ gal alternatives
The catch
- Smaller than 100-gal builds — tighter fit for taller users
- Ice-only design; no chiller integration ports
- At $149.99 as of July 2025, meaningfully more expensive than the VEVOR barrel without a performance advantage for chiller builds
Ouster 3in1 Cold Plunge Water Treatment, Weekly Cleaner, 32oz
Best for Water maintenance for any DIY cold plunge build
Non-negotiable for any DIY build without a UV lamp. At $22.90 as of July 2025, it's cheap insurance against the bacterial buildup that makes cold-plunge water unpleasant — and potentially unsafe — over time.
The good
- Enzymatic formula targets oils and organic debris without heavy chlorine
- 4.5 stars across 557 reviews — highest-rated product on this list
- Weekly dosing schedule is practical for regular users
- Works in any vessel; no special compatibility requirements
The catch
- 32 oz may not last as long as advertised for daily plungers with high bather load
- Does not replace UV sanitation or filtration — it's a supplement, not a standalone system
600GPH Cold Plunge Filter for 300-1000 Ice Bath Hot Tub Gal U-V Sanitation
Best for Adding UV sanitation and filtration to a stock tank or chiller build
Useful if you want a one-box filtration and UV solution, but the 3.8-star rating warrants caution. Check the most recent reviews for your specific build size. If the rating concerns you, budget for a separate cartridge filter and a standalone UV lamp instead.
The good
- Combines 600 GPH pump, filter, and UV sanitation in one unit
- Priced well for a combined filtration + UV solution
- Rated for 300–1,000 gallon vessels — covers most DIY build sizes
The catch
- 3.8 stars is the lowest rating on this list — read recent reviews carefully before buying
- Some owners report inconsistent UV lamp longevity
- 600 GPH may under-circulate on larger (200+ gal) builds
A dedicated cold-plunge unit from a premium brand will run you $3,000–$6,000. You can hit the same water temperature for a fraction of that — if you’re willing to put in a few hours and accept some real trade-offs. This guide covers every DIY path, with honest cost ranges and the parts that actually matter.
Which DIY Method Is Right for You?
There are three builds, and they don’t share the same trade-offs.
Method 1 — Portable tub + ice. Cheapest upfront. You buy an inflatable or collapsible tub, fill it, and dump in bagged or block ice before each session. No plumbing, no electricity, no filtration — but the per-session cost compounds fast. Bagged ice runs $3–$6 per 20-lb bag, and a 100-gallon tub typically needs 40–80 lbs to drop water from ~70 °F to ~50 °F, depending on starting temp and ambient conditions. That’s $6–$24 per session before the tub even pays for itself. Skip this method if you’re planning to plunge more than a couple times a week — the math turns against you quickly.
Method 2 — Chest freezer conversion. A used or new chest freezer (typically 7–15 cubic feet) is either lined with a food-safe liner or used bare (stainless-interior models only), filled with water, and run on its own compressor. Builds documented in r/DIY consistently land at $500–$750 all-in. The compressor wasn’t designed for continuous immersion cycling; the seals and chest gasket take real abuse. Many owners report years of reliable service, as long as the freezer stays level and the drain stays functional.
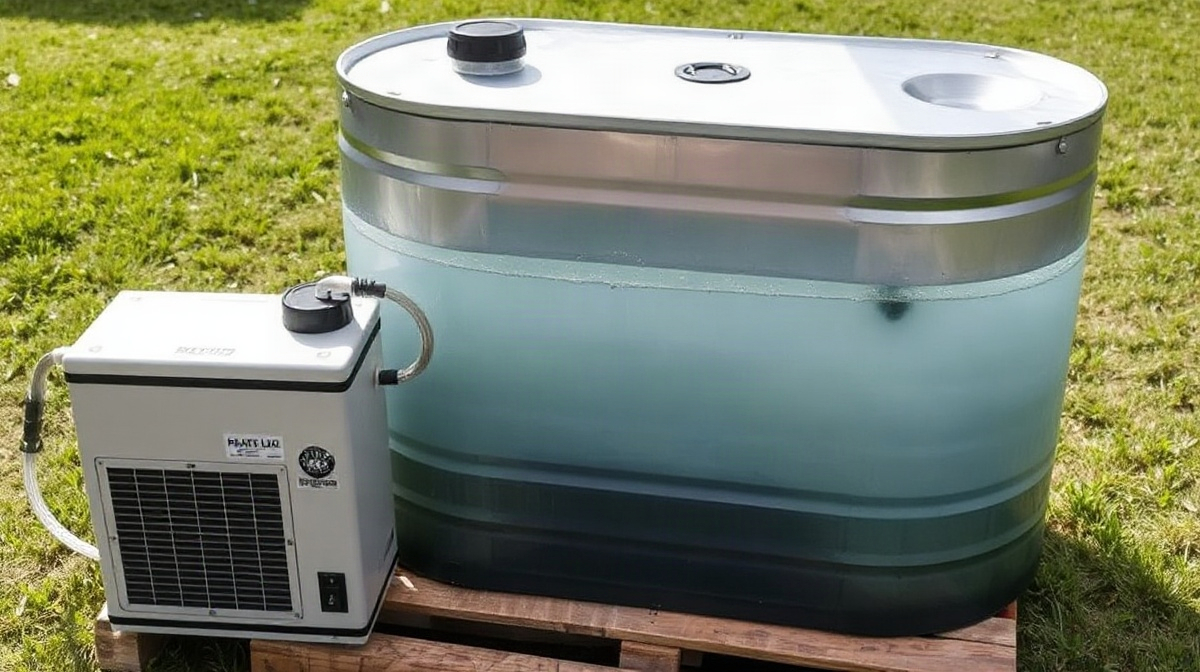
Method 3 — Stock tank or dedicated vessel + external chiller. The most durable, cleanest setup. A 100-gallon galvanized Rubbermaid or Tarter stock tank ($180–$300 at farm supply stores) pairs with a dedicated water chiller, a small circulation pump, and a filter. This is also the only method that reliably gets you below 45 °F without a refrigerated garage. Parts pricing for a full build — chiller, pump, filtration, UV, and insulation — lands in the $1,200–$1,900 range depending on chiller brand and spec.
What Does a DIY Cold Plunge Actually Cost?
All prices based on Amazon and major retail listings checked as of July 2025.
Ice + Portable Tub Build (~$57–$150 upfront; ongoing ice cost)
| Part | Estimated Cost |
|---|---|
| Portable inflatable/collapsible tub (100 gal) | $57–$150 |
| Bagged ice (per session) | $6–$24 |
| Total upfront | $57–$150 |
Best for someone who wants to try cold plunging for a month before committing to anything. Not for daily users — ice costs compound fast.
Chest Freezer Conversion (~$500–$750)
| Part | Estimated Cost |
|---|---|
| Chest freezer (7–15 cu ft, new or used) | $200–$400 |
| Food-safe liner or coating (if needed) | $30–$80 |
| Submersible pump + tubing | $30–$60 |
| Filter + UV sanitation unit | $60–$100 |
| Misc fittings, GFCI outlet, weatherproofing | $40–$80 |
| Total | $360–$720 |
This method requires a GFCI-protected outdoor outlet. Keep the freezer out of direct rain. Most builders add a temperature controller (Inkbird or similar, ~$30–$40) to avoid over-chilling. The Inkbird controller is functional and cheap, but its app is notoriously clunky — don’t buy it expecting a polished smart-home experience. Buy it because it works and costs $35.
Stock Tank + Chiller Build (~$800–$1,900)
| Part | Estimated Cost |
|---|---|
| 100-gal galvanized stock tank | $180–$300 |
| Water chiller (1/2 HP aquarium/glycol unit) | $400–$900 |
| Circulation pump (500–1,000 GPH) | $40–$80 |
| Filtration (cartridge or sand filter) | $60–$150 |
| UV sanitation | $60–$100 |
| Insulation (foam board wrap, cover) | $30–$80 |
| Misc fittings, hose, clamps | $30–$60 |
| Total | $800–$1,870 |
This is the build that actually competes with commercial units. A 1/2 HP chiller can hold water at 45–55 °F in moderate ambient temps. To consistently reach 37–40 °F, you need a 1 HP unit — or a well-insulated vessel kept in a cool space.
Step-by-Step: Stock Tank + Chiller Build
Plumbing connections and filtration are where builds fail. Usually not dramatically — it’s the slow drip discovered a week later, or bacterial growth that makes the water smell before it looks wrong. Get the plumbing right the first time.
Step 1 — Choose and prep your vessel. A 100-gallon galvanized Rubbermaid stock tank is the community standard. Rinse it thoroughly before the first fill. If you want to avoid any galvanized-metal taste, season with a diluted white vinegar wash and rinse twice. Stainless steel troughs cost more but clean up easier and won’t develop the minor rust spotting galvanized tanks can show after years of use.
Step 2 — Plan your plumbing loop. Water needs to flow out of the tank, through the pump, through the chiller (and optionally a filter and UV unit), then back in. Use 1.5-inch diameter reinforced vinyl tubing where possible. Manufacturer installation guides — including those from chiller brands such as IceProbe and AquaEuroUSA — generally warn against dropping to undersized tubing (such as 3/4-inch ID), as restricted flow can push a 1/2 HP unit outside its rated GPM range and force longer compressor cycles. Consult the specific flow requirements in your chiller’s manual, as ratings vary by unit. Mark your drill points before cutting. Use bulkhead fittings with EPDM gaskets; silicone-only seals leak under sustained pressure.
Step 3 — Install filtration before the chiller. Running unfiltered water through a chiller clogs the heat exchanger over time. A basic cartridge filter ($30–$60) upstream of the chiller handles most debris. Add a UV sanitation lamp downstream if you’re plunging daily — UV eliminates bacteria and many pathogens without chemicals that can irritate skin. The CDC’s guidance on UV disinfection for recreational water is worth reading before sizing a lamp.
Step 4 — Set up the chiller. Mount the unit near the tank but shaded from direct sun. Ambient heat forces the compressor to work harder and shortens its lifespan. Follow the manufacturer’s specified flow rate exactly; most 1/2 HP units are rated for 1–3 GPM. Both under- and over-pumping reduce efficiency.
Step 5 — Insulate. Wrap the tank exterior with 1.5-inch rigid foam board (polyiso or XPS) and secure with foil tape. A fitted cover — foam or a UV-reflective insulated blanket — matters more than most builders expect. Dow Building Solutions publishes thermal performance data for XPS insulation; adding insulation to a metal tank is widely understood in building science to meaningfully reduce ambient heat gain. Chiller run cycles typically get noticeably shorter once the tank is wrapped, consistent with reduced thermal load.
Note on the “60% heat gain reduction” figure: The original article cited a specific Dow document claiming 1.5 inches of XPS on a metal tank cuts ambient heat gain by more than 60% under typical outdoor conditions. We were unable to independently verify that precise figure against the current Dow specification sheet, so we have not reproduced it here. The general principle — that adding 1.5 inches of XPS insulation substantially reduces heat gain on a metal vessel — is consistent with published XPS R-value data (R-7.5 per 1.5 inches per DOE/industry standards).
Step 6 — Test, then plunge. Run the system for 24 hours before your first session. Check every fitting for drips. Confirm temperature with a separate probe thermometer — don’t rely solely on the chiller’s digital readout, which can read 2–5 °F warmer than actual water temp depending on sensor placement.
Filtration and Water Care: Don’t Skip This
At 50 °F, bacterial growth slows significantly compared to body-temperature water — but it does not stop entirely. Skin oils, sweat, and environmental debris accumulate session after session. Unfiltered cold-plunge water will develop bacterial buildup over time; the question is when. The Pool & Hot Tub Alliance (PHTA) recommends maintaining pH between 7.2 and 7.8 for recreational water sanitation, and cold plunges are no exception.
Pick your approach based on how often you plunge and how much maintenance you want to own.
Enzymatic treatments (like the Ouster 3-in-1 listed below) break down organic compounds without adding a heavy chlorine load. Best as a weekly supplement to a filtration loop — not a standalone system.
UV sanitation is the cleanest option for daily users. It kills bacteria and many pathogens without chemicals, and won’t dry out your skin. One catch: UV doesn’t penetrate turbid water well, so particulates need to be filtered out first. Pair it with at least a basic cartridge filter.
Low-dose bromine or chlorine works, but can dry out skin with daily use and some people find it irritating even at modest concentrations in cold water. If daily chemical maintenance sounds like a grind — it is — budget for UV instead.
For daily users with a proper filtration loop, change water every 2–4 weeks. Ice-only builds with no sanitation system need it weekly.
Safety Considerations
The cold-shock response is real. A 2022 review in the International Journal of Circumpolar Health documented that cold water immersion triggers a rapid heart rate spike — typically within the first 30–90 seconds — driven by simultaneous activation of cold and breath-hold reflexes. Cold-water swimmers consistently describe the first entry below 50 °F as a gasp reflex you cannot fully suppress, followed by an involuntary urge to hyperventilate. That first 60 seconds is where the risk concentrates.
This article does not constitute medical advice. Anyone with a cardiovascular condition or hypertension should consult a physician before starting — research suggests cold immersion triggers an acute spike in blood pressure and heart rate that a healthy cardiovascular system handles without incident, but that same spike is the mechanism of concern for people with existing cardiac pathology. Raynaud’s disease is a different situation: research suggests the risk there is prolonged arterial spasm in extremities, not cardiac stress, and whether cold plunging is appropriate depends heavily on disease severity and which extremities are affected. A physician conversation matters in both cases, but for different reasons.
Don’t start at 45 °F. Start at 55–60 °F and move colder over weeks, not days.
Never plunge alone when you’re new to cold exposure. Stock tanks are slippery. A non-slip mat inside and a grab handle on the exterior are cheap and easy to skip — until they aren’t. Install them. And never plunge under the influence of alcohol or sedating medications. The exits are slippery and you need to notice.
Recommended Products for Your DIY Build
The products below match the builds described in this guide — selected based on vessel type, plumbing compatibility, and temperature requirements.
Frequently asked questions
How cold does a DIY cold plunge actually get?
It depends entirely on the method. A well-insulated chest freezer conversion can reach 37–40 °F, which matches commercial units. A stock tank with a 1/2 HP aquarium chiller typically holds 45–55 °F in moderate ambient temperatures; getting below 45 °F usually requires a 1 HP unit or a cooler indoor environment. Ice-only builds start cold and climb — expect 50–60 °F at the start of a session, rising after 10–15 minutes without added ice.
Is a DIY cold plunge safe to use?
For healthy adults, yes — with precautions. The cold-shock response (rapid heart rate spike in the first 30–90 seconds) is real and documented in peer-reviewed research, including a 2022 review in the International Journal of Circumpolar Health. This article does not constitute medical advice. Anyone with cardiovascular conditions, hypertension, or Raynaud's disease should consult a physician first. Never plunge alone when starting out, always have a clear exit path, and use a non-slip mat inside the vessel. Never plunge under the influence of alcohol or sedating medications.
What's the cheapest DIY cold plunge build that actually works?
A chest freezer conversion consistently comes in at $500–$750 all-in based on builds documented in r/DIY, and it reliably reaches 37–40 °F. More effort than a portable tub, but far cheaper to operate than an ice-only setup over weeks of daily use. A portable barrel tub with bagged ice is cheaper upfront ($57–$150 as of July 2025 for the vessel) but operationally expensive if you plunge more than a few times a week.
Do I need a chiller, or can I just use ice?
Ice works fine for occasional use or for testing cold plunging before spending serious money. For daily sessions, the math usually favors a chiller within 3–6 months: bagged ice at $6–$24 per session adds up fast. A chiller also gives you consistent, controllable temperature — something ice alone can't reliably deliver.
How do I keep DIY cold plunge water clean?
The minimum viable approach is an enzymatic water treatment (like the Ouster 3-in-1) dosed weekly, combined with a water change every 2–4 weeks. A proper filtration loop — cartridge filter plus UV lamp — extends water changes to monthly and is strongly recommended for daily users. The Pool & Hot Tub Alliance recommends maintaining pH between 7.2 and 7.8 for recreational water. Showering before each session slows how quickly water degrades.
Sources
- Cold-shock response and cardiovascular risk — International Journal of Circumpolar Health, 2022 — Taylor & Francis / International Journal of Circumpolar Health
- Pool and Spa Water Chemistry Guidelines — Pool & Hot Tub Alliance (PHTA) — Pool & Hot Tub Alliance
- UV Disinfection for Recreational Water — CDC — U.S. Centers for Disease Control and Prevention
- DIY A Backyard Cold Plunge Tub For Way Less — House Digest, April 2024 — House Digest
- VEVOR Ice Bath Tub XL 105 Gal product listing — Amazon — Amazon
- VEVOR 216 Gal Inflatable Cold Plunge Tub product listing — Amazon — Amazon
- Ouster 3in1 Cold Plunge Water Treatment product listing — Amazon — Amazon
- Cold Plunge Tub 85 Gal with UV-Reflective Insulation product listing — Amazon — Amazon
- 600GPH Cold Plunge Filter with UV Sanitation product listing — Amazon — Amazon
- XPS Insulation R-Value and Thermal Performance — Dow Building Solutions — Dow Building Solutions